
Fortress City

I was given this map already nearly complete in layout, though without any scripting and a free hand regarding potential functionality, to create a defensive map, where the player didn't need to
survive. One playthrough should take around 20-30 minutes but not much longer. I also gave myself the goal to see whether I could create a moment where it became clear to the player that survival
was no longer an option and the only thing left was to take as many enemies as possible with you.
I chose the Saxonians as defenders because we didn't yet have a Saxonian defensive mission. At the same time, the Russviets with their units were better suited to
attacks than the Polanian troops, with more HP, at a slightly slower movement speed and stronger AoE Artillery, especially useful against dug-in defenders.
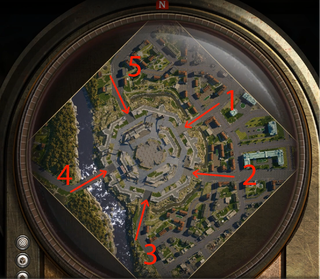
Overview over the approach lanes
The map starts with a short briefing that informs the player that they have to hold out until reinforcements arrive and that the enemy will attack them from all sides. However, they have two
powerful Destroyer Cannons that pose a danger to even the heaviest enemy mechs. Should the player fail to crew the Destroyer Cannons in time, they will be reminded to do so, as
they are a valuable asset in all situations. The Destroyer Cannons can cover either road 5 or 1 and 2 or 3. The player themself starts with a small force of mechs and soldiers, one
anti-infantry mech, one general-purpose mech and one anti-mech mech.
Furthermore, they have one artillery piece, one of each kind of infantry and two bunkers watching approach 1 and 3. These bunkers are Tier 1 and can easily be upgraded to Tier 2 before the first
attack wave hits. Furthermore, the player has four resource generation spots on the outermost ring of the fortress. Defending these is a priority for long term survival.
The map itself is split into two chronological phases. Phase One is the time between the start of the map and the arrival of reinforcements. Here I intended to give players a fun
challenge that would be doable to all but the worst players. Everyone with some knowledge of the game is supposed to be able to reach phase two.
The first attack on lane 1 consists of a heavy mech with infantry support. This conveys a sense of the situation's seriousness to the player and provides an exciting start to the mission. It also
is an excellent opportunity to test out the Destroyer Cannons. Simultaneously, two weaker forces attack from lane 5 and lane 3, adding additional targets for the Destroyer
Cannons, as well as showing the player that he can't rely too much on Destroyer Cannons as they can only guard one approach at a time.
After this, the player is attacked by mostly infantry attacks from all sides. This is intended to give the player both the knowledge that there will be rapid assaults from all sides and provide
them with the time to repair potential damages from the first attack while building up their forces. The player should also learn that they will have to shift their troops around to optimally
counter enemy attacks, as they are unlikely to have already enough forces to cover all five lanes.
This is followed by another stronger attack on lanes 2 and 5, giving the players worthy targets for the Destroyer Cannons once more. The continuous increase in difficulty leads to a
massed attack from lane 4 with strong and fast units. Should the player have no AoE units yet, this fight will likely be challenging and inform the player that the AI might try to trick them by
drawing their units to specific lanes to strike quickly on others.
The knowledge of this is tested with the following attacks, which pits the player against another assault from all sides, with the most potent attack on lane 4, both so it won't be weakened by
the destroyer cannons as well as to draw the players attention there. The forces are sent so that the player's concentration will be away from lane 2, where now allied units will appear. A
cutscene plays where the player learns that the allied units were destroyed, and three artillery pieces are the only survivors. They are also informed that fleeing units will be destroyed if the
player doesn't save them.
Without any knowledge, it is possible to do so. With it, it is relatively easy to save those units, as the attackers are spawned in only after the fleeing units, giving the player some time to
react. All protected units will join the player. They were chosen so that they are helpful to have but not so powerful that saving or not saving them is a dealbreaker for any given playthrough.
After the units are saved or lost, a small conversation plays in the background, confirming that there is no way of survival and that the soldiers in the fortress have resigned themselves to
doing their duty. The objective changes from "Hold the fortress" to "Defend the fortress to the last man", further highlighting that survival is no longer an issue.
Here the Second Phase starts where my intention is no longer to give the player a challenge most players will survive, but rather to provide them with a challenge that will slowly wear
down even the most experienced players. To that end, I now begin to deploy artillery, which can destroy the players' defences quickly from a distance. In contrast, the player has to give up good
defensive positions to eliminate the artillery before it does too much damage. Further, all attacks become much stronger now, and respite much shorter, to non-existent.
The phase starts with a strong attack over lane 4, intended to draw the players attention, while two lighter attacks come down lane 3 and 5. These attacks are designed to not look like a priority
to the player. This is another trick, as they contain special units with the ability to jump over obstacles, which allows them to enter the fortress at unexpected positions. Their goal is to
destroy the Destroyer Cannons, one of the players' stronger assets, without the player noticing until it is too late. It is possible to defend the destroyer cannons, rewarding quick or
attentive players.
The following attacks concentrate on the opposite side on lanes 1 and 2, forcing them to shift their mechs around, especially since the Destroyer Cannons that could cover these
approaches are likely destroyed or damaged. To escalate the enemy strength further, there is more artillery in this wave, together with the strongest enemy units to appear on this map.
A weaker attack on more sides, lanes 3, 4 and 5 mixed in with further attacks on the destroyer cannons, are intended to keep the player on their toes and allow little time to repair and
reorganize. This pressure is only heightened since the player is forced to choose between protecting the Destroyer Cannons and the units directly attacking the fortress. This pattern
continues throughout the following attacks, which come from direction 1,2,5, with the specific intention of drawing the players surviving units there, setting up a weakness that a strong attack
from lane 4 exploits.
After this, the player receives their last respite to repair and fix up whatever defences are still standing before the final attack. This attack consists of staggered attacks from all sides,
mixing some of the strongest units in the game with large amounts of artillery. The intention is for this attack to overwhelm everyone still standing, though particularly skilled players may
survive.
Those that manage to survive are now facing off waves randomly chosen from one of five patterns. These all contain various mixtures of strong mechs, artillery, and specialized units to attack the
Destroyer Cannons directly, should the player manage to keep them alive this long. They start by attacking from two sides but quickly escalate to all five sides every minute. The only
constraint is to keep performance up. Should too many units be on the field, the next wave's spawning will be delayed by twenty seconds, after which the number of units on the field is
rechecked.
After the player loses, they are treated to a short cutscene, showing off the carnage in the centre of the fortress, likely strong traces of damage, with quite a few mech wrecks. Over this plays
a short monologue in which a soldier wonders if it was worth it to hold the fortress this long, slowing the enemy down, asking his friend, who is already dead.
After the first release, an exploit was found where players blocked off one of the lanes near the enemy spawn point and then simply bombarded enemies inside the fortress, who wouldn't move
outside to attack them further. I fixed this exploit by ensuring that the enemy would attack all player-owned structures and units inside the fortress. I paired this with readjustments to the
loss parameters, failing the mission if there were no players units within the fortress.