
Stronghold Siege

This map I developed from start to finish, first developing several ideas, from which this one was chosen. I chose the Polanians as the Attacker, as our first Challenge Map had
been with the Polanians as the defenders, so it was only fitting to have them as the map's protagonists. The choice of Saxonians as the defenders came in part because their
artillery pieces just looked more stationery and the fact that there was a mission with a somewhat similar narrative, featuring the Rusviet as defenders. The only other Goal I had, was
that the map should have 20-30 minutes of playtime for one playthrough.
The starting cutscene shows off the goal to the player. The narration ensures to inform the player that this fortress has withstood several assaults before. Yet it also gives a good reason why
the player will succeed and adds some spectacle, with the explosion ripping apart the fortifications the camera just panned over.
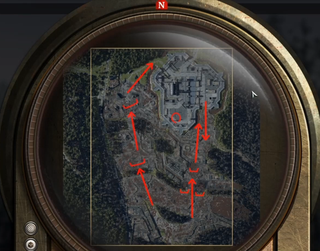
The two paths, the player may take
A tactical briefing follows that conveys all relevant information to the player. The enemy fortress is the goal, providing some further lore, why the player should care. The player has two main
paths towards the stronghold. They can either choose the right path and attack through the breach that was just created. The enemies there will be weaker, though they will receive reinforcements.
This path is linear with a recurring attack and counter-attack pattern, forcing the player to regularly switch between offensive and defensive actions. The left path, on the other hand,
sees well dug-in defenders, though without any reinforcements. This path is more open, as the enemy moves very little on its own, and it's defences are static, making flanking actions vital to
survival.
Lastly, the player learns that all losses are replaceable; however, both dialogue and the challenge map's explicit goals discourage reckless spending of soldiers. The player then starts the game
proper, inside their base. Mud and trench walls are everywhere, setting the scene for what is to come. The only thing to stand out are two allied units next to transport mechs, partially buried
in mud. Approaching them with one of your units triggers a short dialogue, in which they inform the player that the mechs are stuck in the mud and won't be able to join the attack. This provides
a lore reason why one of the stronger mechs from Polania, is not utilized in this attack. The level design reason is that the mortar on these mechs would allow the player to engage
distant enemies and encourage shelling them before advancing. This would go against the intended way of playing the map in a series of assaults and would be a suboptimal strategy to gain the
map's best outcome.
The rest of the players' army is designed to give them good tactical flexibility. There are two of all early game units, besides weapon systems, as well as the Polanian specialized
anti-mech mech to provide heavy support. While the use of mech is encouraged by having a good amount of them and their ability to counter everything the enemy has, the infantry itself is far from
useless. Grenadiers can quickly clear weapon systems that other units can't reach, and other more specialized infantry perform well in their roles. Engineers will be invaluable either way to keep
your mech force combat-ready.
Should the player choose to follow the right path, they will first encounter two older craters, defended by sandbags and two heavy machine guns. While it is possible to attack and destroy them by
attacking the machine gun head-on, it will damage or even destroy valuable units, slowing you down. It is, however, very easy to outflank these first machine guns and destroy them safely from the
side. After this, the player will be able to defeat the remaining infantry easily.
It is here that the first wave of enemy reinforcements will arrive. One anti-infantry mech accompanied mostly by flamethrowers and riflemen. This group only poses a moderate challenge to the
players' mechs. Their danger comes because they are actively counter-attacking and should force all but the best players into a defensive position. While all players will face this wave at
roughly this location, the others are time-dependent, and as such, a fast player will meet fewer reinforcements further towards the goal. In contrast, a slower player is more likely to get bogged
down and face more substantial reinforcements. This rewards those who manage to push fast, while punishing those players that are to slow. This playstyle is also encouraged by the second
handicap, requiring the player to beat the map within a time limit.
After the first wave of reinforcements is defeated, the player can then continue to the right side's first flag. The flag itself is only defended by infantry, but further behind, inside the
crater created in the beginning, there are two anti-mech cannons. These anti-mech cannons can't be flanked. However, they are nearly destroyed and provide an easy target, teaching the player that
some challenges have to be faced head-on. With them eliminated, the remaining infantry are easy targets for the player. With the flag captured, the players' destroyed units now respawn closer to
the fight, allowing them to continue the push without losing too much time for destroyed units.
The next obstacle is the base behind the new breach, with two mortar systems. No artillery was used, as it's range would have been large enough to stop the player from capturing the flag before.
On the walls to the side are further machine guns, supported by infantry. This time, it is impossible to flank, and facing the enemy head-on will likely unnecessary damage, as a mortar system and
an MG focus on you. Instead, rushing past the enemy to reach a flanking position is the best option, something the player will need in the next obstacle.
It is here that the average player will face the next wave of reinforcements. This wave contains an Anti-Tank Mech, together with an Anti-Infantry Mech with supporting infantry. Together they
pose a moderate danger to the players' army, especially if they are still fighting other units. A faster player will likely manage to push into the fortress before meeting them. If the player is
even slower, they will face two Anti-Tank Mechs together with an Anti-Infantry Mech in the next wave. This arrangement will likely pose a greater danger to any player and test them. The last
wave, three Anti-Tank Mechs and one AoE Mech, will punish any player who is too slow to reach the fortress in time.
The fortress entrance on the right side is defended by a heavy cannon that can heavily damage or destroy any of the player's unit. It is impossible to get past without sacrificing some units to
distract the cannon while the actual attack pushes through. Behind that are infantry, which only poses a challenge if your attacking force is too damaged from the cannon or insufficient in
numbers. After the cannon is decrewed for the first time, it is destroyed to prevent the enemy from recapturing it.
After that, the player faces another heavy mg and cannon pair, though both can be outflanked or relatively quickly taken out head-on. At the same time, several enemy infantry units provide some
distraction. With this obstacle destroyed, the two paths rejoin.
Should the player instead decide to follow the left path, they will meet some enemy patrols in no man's land. These give the player something to do on the path to the first defensive line,
teasing them with a fun fight. However, after taking only a few casualties, the enemy patrols will retreat, pulling the player with them towards the first flag.
The player faces a more robust defensive line, with bunkers and more weapon systems, all undamaged. For the first challenge, the player has to defeat a bunker/weapon system crossfire, supported
by either an MG or a mortar, while both bunkers contain an MG. Rushing past is made hard by other units further behind while flanking is impossible. This forces the player to find a way to
destroy either bunker or weapon system quickly before taking on the other. After this, the player has to clear the rest of the infantry defence and two other mortars.
If the player pushes too far here, they will enter the firing range of two mortars further behind. These mortars can only be reached through trenches, with infantry protecting them. This forces
the player to either retreat a bit or attack more relentlessly. Furthermore, if the player pushes through one side, the other will begin to retreat to more favourable positions. Here a player who
takes care to destroy all enemies will have an easier time than those who rush forwards. Sound tactics are rewarded that way.
After taking the first flag, the player receives a new unit, which will make the attack a bit easier, as the left path is physically longer. However, there are no reinforcements to force the
player on the defensive. Should the player take the straight path towards the next flag, an MG and anti-mech cannon team will likely take a heavy toll on the player. However, by trying to disable
the mortars, the player will discover two potential ways to flank the enemy. Using them, they will now fight inside a village against mostly infantry. There is a lot of cover, though most can be
destroyed, and there are another cannon and MG to be flanked and destroyed. After the flag is taken, all remaining units in the village will try to retake it. This will further reward players who
already eliminated most enemies in the village.
The last obstacle before the heavy cannon on this side are two cannon-bunkers with overlapping fields of fire. It is possible to push past them to destroy them from behind, or to flank one,
destroy it, and then flank the other, allowing the player several approaches. For the heavy cannon, however, the main part is the same to the right side. Distract with disposable units, rush the
others through the field of fire. Here the player again has several choices to disable the cannon. Flank it and destroy it from the side or push up to the wall and throw grenades up. Furthermore,
this entrance is less defended, allowing the player to push through faster to make up for the longer physical path.
Inside the fortress, both paths face the last obstacle, a raised platform with two heavy MG's and a cannon, as well as two artillery mechs on it. The artillery mechs won't fire on the player
until they start their assault, facing away from them before.
The cannon itself can be outflanked. The MG's cannot and have to be destroyed in one last assault while the artillery mechs join the battle. This is intended to give the player a worthy sendoff
to the map, with an assault against a well-defended position, yet also be easy enough that no player will fail the challenge here.
With the fortress captured, the end-cutscene plays, and depending on how many units you lost, the tone will change. With minimal losses, the soldiers are jubilant and are expressing hopes for a
short war. With more casualties, the soldiers grow more horrified, questioning whether the results were worth the costs. This is to further tie into the War is Hell theme of Iron Harvest while
also further rewarding players who played well.